Introduction
A site-to-site VPN setup consists of at least two networks connected via a virtual private network.
Use the procedure in this guide to set up a site-to-site VPN connection with Access Server and a site-to-site connector using an OpenVPN client.
We outline creating a site-to-site VPN connection using the following:
- Access Server hosted on the headquarters network.
- An OpenVPN client installed on the branch network.
- Encrypted traffic flowing between the connected networks.
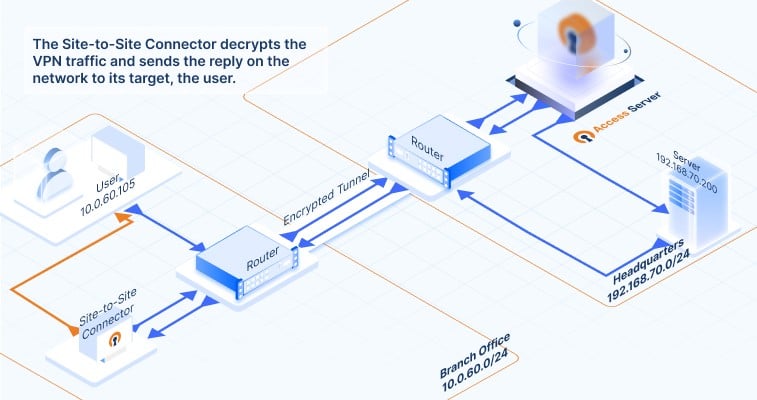
Example site-to-site setup
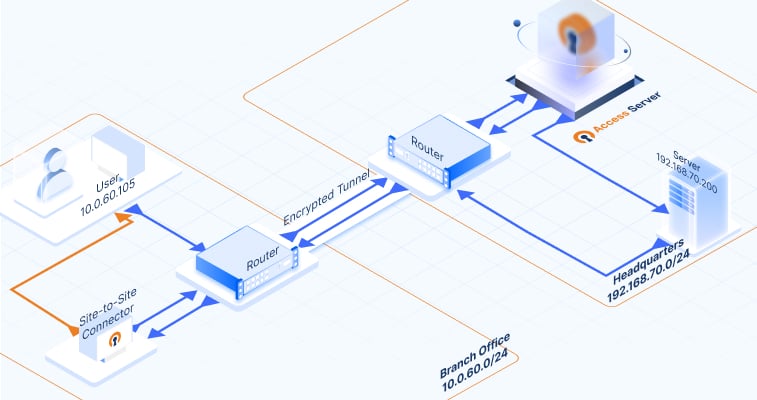
Notice that the diagram includes the following IP addresses and subnets:
| Device | IP address |
|---|---|
| Access Server (OpenVPN server) | 192.168.70.222 |
| Site-to-site connector (OpenVPN client) | 10.0.60.55 |
| Network | Subnet |
|---|---|
| Headquarters | 192.168.70.0/24 |
| OpenVPN virtual network | 172.16.0.0/20 |
| Branch office | 10.0.60.0/24 |
We'll use the IP addresses and subnets for our example procedure. As you set up your site-to-site VPN, use your specific IP addresses and subnets for your devices and networks in the appropriate steps.
Site-to-site VPN benefits
Setting up a site-to-site VPN for your company interconnects your corporate network, remote office, cloud networks, and remote workers. In a site-to-site VPN, devices in one network can reach devices in the other network and vice versa and provides the following benefits:
- Reliably connect private networks.
- Keep hardware costs down.
- Provide secure cloud network access.
- Efficiently set up branch connectivity.
Note: The implementation steps for configuring the VPN server and clients are relatively simple. The complexity comes in when dealing with firewalls, security filtering options, and altering routing tables in routers and internet gateways. Each of our customers has a unique setup, depending on the routers and internet gateways, from various brands and models. The commonality is that all routers can route traffic using static routes. That capability allows routing traffic from one network to another through a gateway system, such as Access Server with an OpenVPN client.
A simple site-to-site VPN setup
A site-to-site VPN setup consists of the following key components:
- VPN server: A Linux server to host Access Server.
- VPN client: A Linux server to host the OpenVPN client software that connects securely with the VPN server.
- VPN tunnel: An encrypted link created by the VPN server and client(s) for communicating data between them.
Our example site-to-site VPN setup consists of a headquarters network connected to a branch office. These are the high level steps:
- Install Access Server (VPN server) on a headquarter's (HQ) network server.
- Connect Access Server to the same router as the other devices and servers in the HQ network.
- Provide internet access through the router to the HQ network.
- At a branch office, connect the network to the internet through a router.
- Install the OpenVPN client software (VPN client) on a Linux server on the branch network.
- Connect the OpenVPN client to Access Server (VPN tunnel) to start an active tunnel for secure data communication.
- Allow traffic between the networks through each network's routers, firewalls, or internet gateways.
With this setup, the two separate networks work as one, with securely encrypted data packets traveling over the internet. Access Server on the headquarters network and the OpenVPN client on the branch network both act as gateways for the networks. A user in the branch office can see and access servers in the network at headquarters. A site-to-site VPN with Access Server is an economical solution to connect your distributed networks.
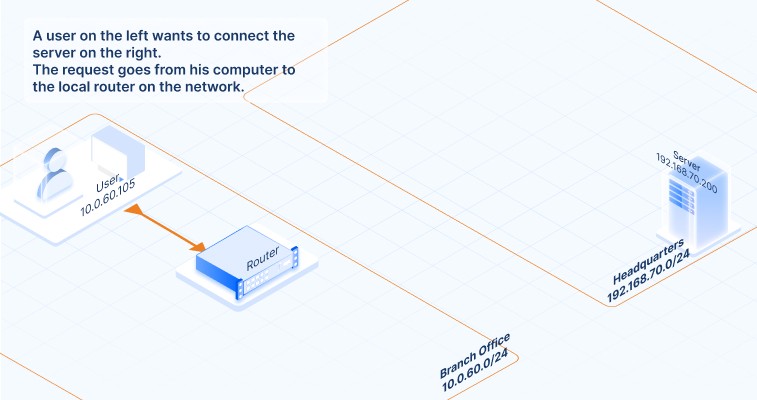
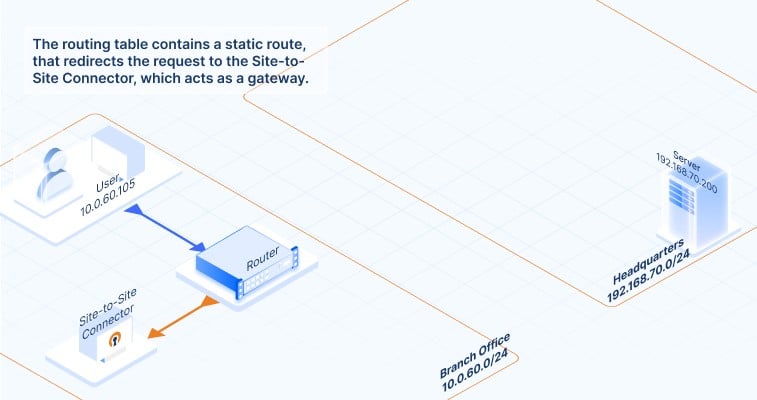
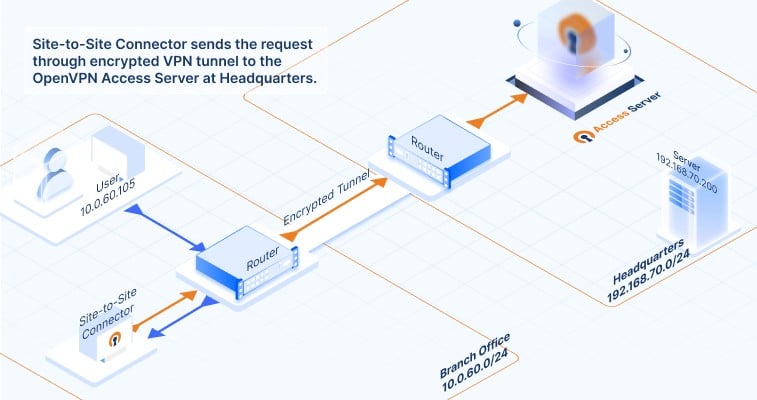
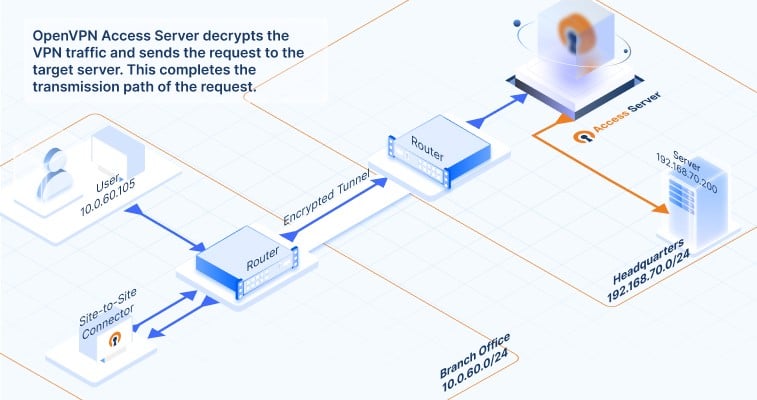
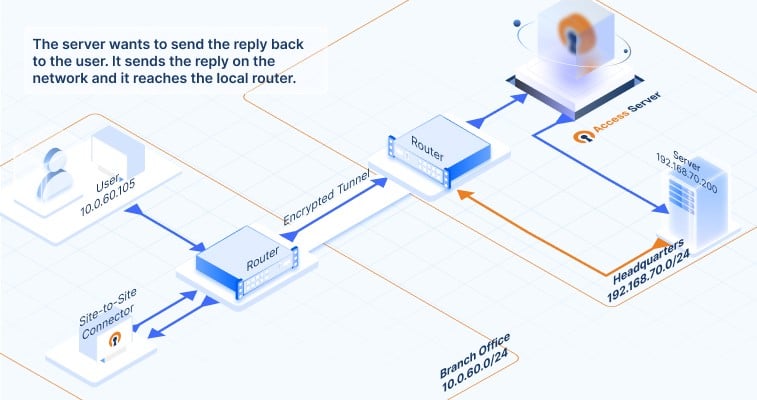
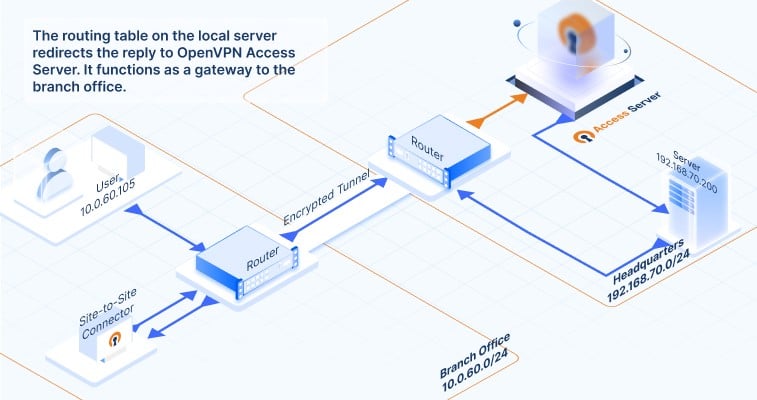
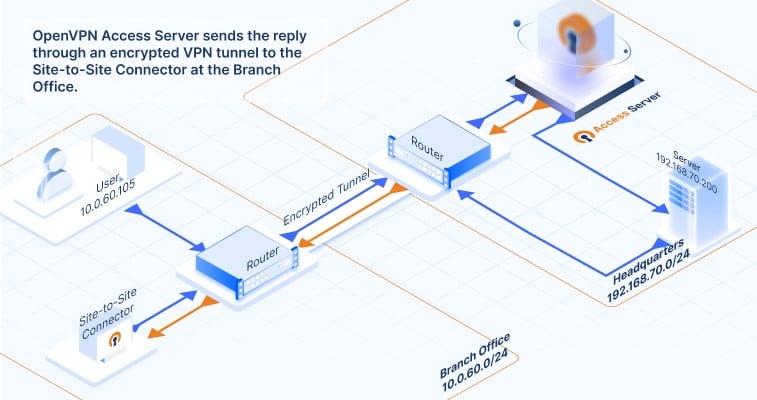
Site-to-site VPN data communication traffic flow
How does data communication flow between the connected networks? Click on the images below to follow the traffic flow of data communication. It gives you a visual of what happens when a request from a computer in a branch office reaches an application server at the HQ network, and how that response makes it back. Here’s how the data travels:
How to set up your site-to-site VPN with Access Server
Before you begin
Ensure you have Access Server installed with a configuration that includes:
- Internet access.
- A private IP address in your HQ network.
- Port forwarding so Access Server is reachable from the outside.
- Access Server knows its public address (preferably a DNS record that resolves to the public IP address).
- Any other necessary access depending on your network hardware and software (such as opened firewall ports).
With Access Server running, it’s time to configure settings for your site-to-site VPN in the Admin Web UI.
These configuration steps walk you through setting up a site-to-site VPN, with example subnets. Adjust your configuration to match your subnets.
Note: Subnets must differ between the separate networks for site-to-site to work with Access Server.
Allow access to private subnets
- Sign in to the Admin Web UI for your Access Server.
- Click Configuration > VPN Settings.
- Under Routing, and Should VPN clients have access to private subnets (non-public networks on the server side)?, click Yes, using Routing.
- Click Specify the private subnets to which all clients should be given access (one per line).
- Enter the network’s subnet where your Access Server is located—for our example, 192.168.70.0/24.
- Click Save Settings and Update Running Server.
Create a client user
- Click User Management > User Permissions.
- Enter a new username for your OpenVPN client.
- Click Allow Auto-login.
- Click More Settings.
- Select Local for the Auth method.
- Enter a new password.
- Set Configure VPN Gateway to Yes.
- Enter the subnet of the remote network of the OpenVPN client into the box for Allow client to act as VPN gateway for these client-side subnets—for our example, 10.0.60.0/24.
- Click Save Settings and Update Running Server.
Note: Ensure your site-to-site connector user has autologin privileges with local authentication.
Configure routers, firewalls, internet gateways, etc.
Now you need to configure your specific hardware for routers, firewalls, internet gateways, etc.
The HQ network router needs to know:
- There are two additional subnets for the OpenVPN client network and the branch network.
- These subnets are accessed by contacting Access Server's private IP address.
Again, we reference the IP addresses and subnets for our devices and networks:
| Device | IP address |
|---|---|
| Access Server (OpenVPN server) | 192.168.70.222 |
| Site-to-site connector (OpenVPN client) | 10.0.60.55 |
| Network | Subnet |
|---|---|
| Headquarters | 192.168.70.0/24 |
| OpenVPN virtual network | 172.16.0.0/20 |
| Branch office | 10.0.60.0/24 |
Configure your route table to include the routes to these additional subnets through Access Server. Refer to the documentation for your router for steps to add static routes.
In our example, we add the following static routes:
- Network 172.16.0.0 with subnet mask 255.255.240.0 through gateway 192.168.70.222.
- Network 10.0.60.0 with subnet mask 255.255.255.0 through gateway 192.168.70.222.
Note that we specify a subnet mask. Most routing equipment wants the subnets defined in this manner instead of using CIDR format with the /24 and /20 and so on. You can look up tables online that you can use to convert one to the other easily.
With your static routes defined, the HQ router knows to forward traffic with a destination IP address in either subnet (172.16.0.0/20 or 10.0.60.0/24) to Access Server.
Note: Ensure you allow the necessary access through firewalls and other software or devices so you don't block access with those.
Set up the OpenVPN client in the branch network
The next step is setting up the OpenVPN client within your branch network. We recommend using a Linux operating system to host the client serving as a gateway. We use Ubuntu LTS, something you can launch on dedicated hardware or a virtual machine.
Even a Raspberry pi, a very lightweight system, can serve as the OpenVPN client server. Linux is free and has excellent free tools for diagnosing problems that might arise.
Follow the steps below to install the OpenVPN client program for Linux, connect to your Access Server, and enable IP forwarding. You don’t need to install Access Server in the branch network as well.
Install OpenVPN client
Install the open-source OpenVPN client on an Ubuntu OS by running the following command with root privileges:
apt-get install openvpn
After installation, add the auto-login connection profile to the appropriate directory to connect at system startup:
- Open a web browser and enter the URL for the Client Web UI for your Access Server (example: https://192.168.70.222/).
- Enter the username and password of the user account you created for site-to-site connectivity and click Sign In.
- Under Available Connection Profiles, click Yourself (autologin profile) to download the client.ovpn file.
Note: If there isn’t an option to download an auto-login profile, ensure you checked Allow Auto-login for that user under User Permissions in the Admin Web UI.
After downloading the connection profile file, transfer it to your OpenVPN client system. You can do this with SCP, WinSCP, or copying and pasting the file’s contents into a text editor like nano. Place the file in the /etc/openvpn/ directory.
We recommend you rename the file to headquarters.conf or something similar. The file name isn’t overly critical, but you must ensure it ends with the extension .conf for the OpenVPN daemon to pick it up.
Finally, reboot the OpenVPN client operating system. It should automatically connect, and the connection should appear on the Access Server’s Current Users in the Admin Web UI.
Enable IP forwarding
With the OpenVPN client installed, the next step is to enable IP forwarding on the client system.
IP forwarding allows an operating system to accept an incoming network packet on one network interface and forward the packet to a destination on another network.
On Ubuntu:
- Open /etc/systctl.conf with a text editor like nano.
- Uncomment the line #net.ipv4.ip_forward=1. (To uncomment, delete the # character.)
- Exit and save the file, then reboot the OS.
Configure the branch router for the additional subnets
Configure your branch router so it knows:
- There are two additional subnets for the OpenVPN client network and the HQ network.
- These subnets are accessed by contacting the site-to-site connector.
Again we reference the IP addresses and subnets for our devices and networks:
| Device | IP address |
|---|---|
| Access Server (OpenVPN server) | 192.168.70.222 |
| Site-to-site connector (OpenVPN client) | 10.0.60.55 |
| Network | Subnet |
|---|---|
| Headquarters | 192.168.70.0/24 |
| OpenVPN virtual network | 172.16.0.0/20 |
| Branch office | 10.0.60.0/24 |
Refer to your device manufacturer’s documentation for how to add static routes. Ensure you add these on the router in the branch office network where the OpenVPN client system is, not on the HQ network.
Add these static routes:
- Network 172.16.0.0 with subnet mask 255.255.240.0 through gateway 10.0.60.55.
- Network 192.168.70.0 with subnet mask 255.255.255.0 through gateway 10.0.60.55.
Note that you are again specifying a subnet mask. Most routing equipment wants it defined this way instead of using CIDR format with the /24 and /20, etc. You can look up tables online that you can use to convert one to the other easily.
With your static routes defined, the branch router knows to forward traffic with a destination IP address in either subnet (172.16.0.0/20 or 192.168.70.0/24) to the site-to-site connector.
The VPN client then forwards the packets to where they need to go.
Troubleshooting
Other devices and software on your networks can cause connection issues. For example, firewalls on the client or server computers might block traffic from “unknown” subnets; or cloud networks like Amazon AWS require security groups and source checking for allowing traffic.
Furthermore, static routes could be set up incorrectly from LAN to WAN interfaces so that the client or server tries to send the traffic to the internet instead of staying purely on the LAN side of the router.
Unfortunately, too many possible issues lie outside Access Server and its connected OpenVPN client to document them all. Instead, we have tried to provide the means to diagnose the connection yourself.
We recommend referring to our troubleshooting guide to diagnose the connection.
Routing with a cluster setup
If you have a cluster setup, routing for groups is more complicated because each node needs a unique group default subnet. Access Server 2.12.0 and newer supports this use case. Refer to our documentation for details: Group default IP address networks for Access Server.